Category: Entertaining & Recipes

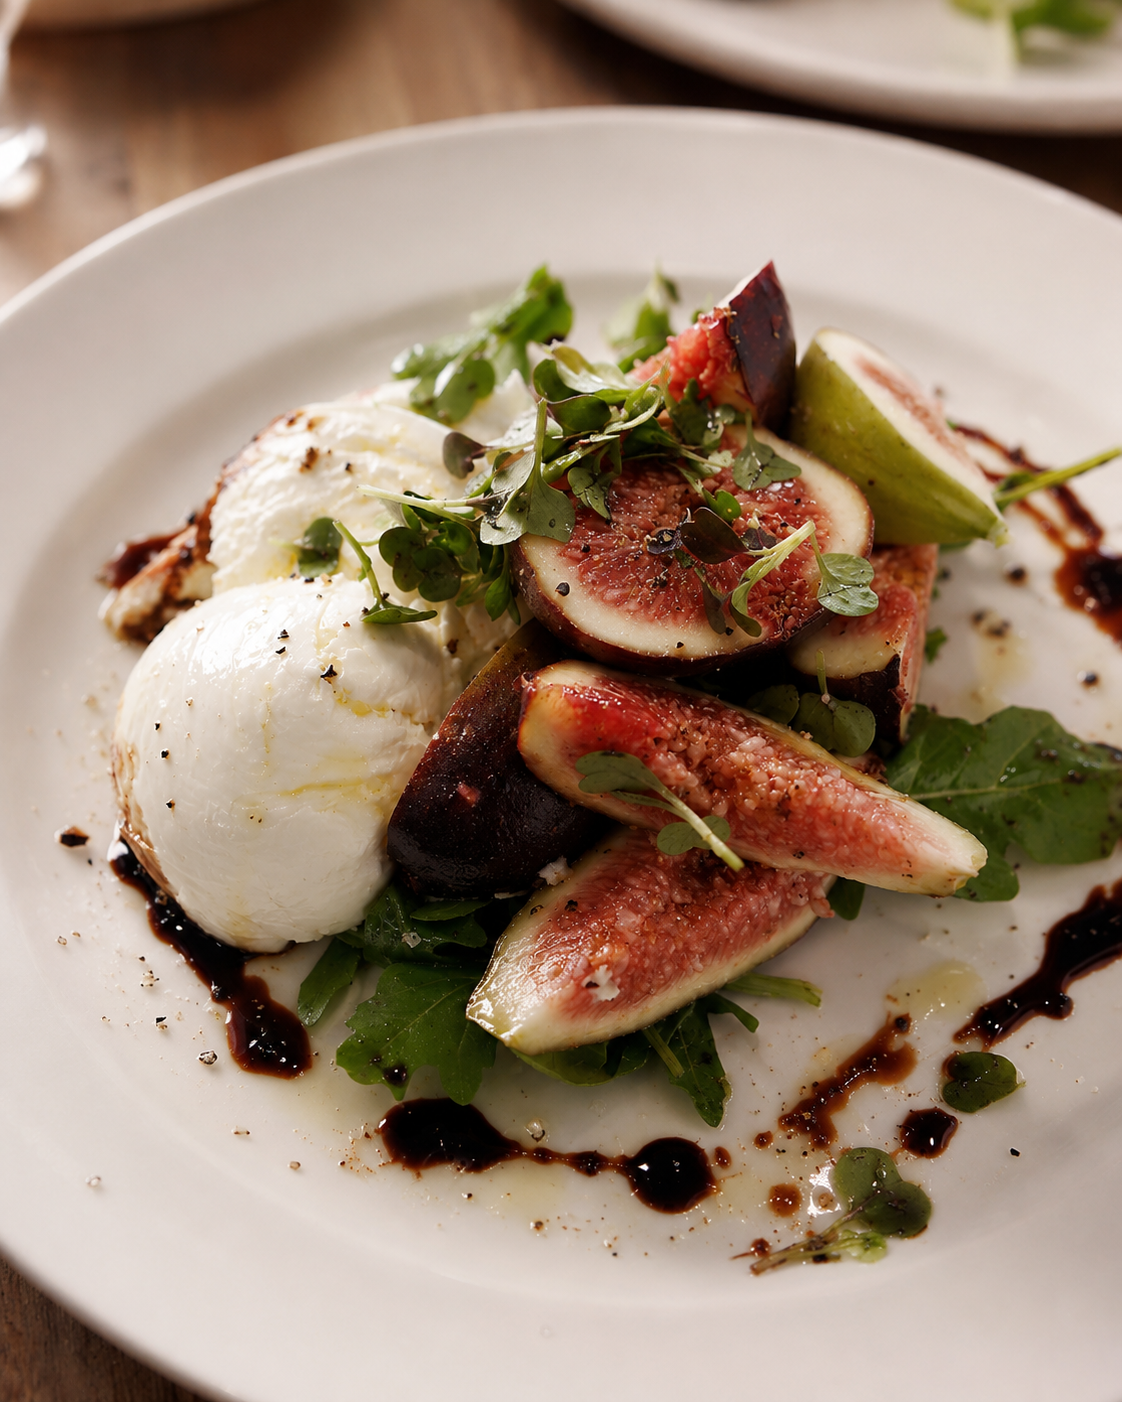
  • Fab Figs

    Fab Figs

    Print
    clock clock iconcutlery cutlery iconflag flag iconfolder folder iconinstagram instagram iconpinterest pinterest iconfacebook facebook iconprint print iconsquares squares iconheart heart iconheart solid heart solid icon

    Fab Figs


    • Author: editor|maison1973

    Description

    This is one of our go-to sharing plates that is ideal for entertaining. We often use this as a side dish or a starter (with a glass of bubbles!) and it generously serves 4. It is super quick and easy to prepare and absolutely heroes the figs and cheese. It’s sweet, salty, peppery and creamy – so good! We often serve ours with a flatbread, some toast or even a cracker. Whatever suits your mood!


    Ingredients

    Scale
    2 large size balls of fresh burrata (an Italian cows milk cheese), drained and kept whole 8 figs, cut 2 of them in half and 6 into quarter wedges. teaspoon of brown sugar small knob of unsalted butter A bunch (or small bag) of fresh rocket (arugula) leaves – washed & drained thoroughly 1 tbls of extra virgin olive oil 1 tbls of balsamic vinegar salt & black pepper micro herbs for garnish (optional)

    Instructions

    1. On a large plate, place the burrata balls
    2. In a small fry pan, heat the small knob of butter
    3. Take the 4 halves of fig and dip them into the brown sugar to lightly coat
    4. Place sugar side down into pan and gently fry until they caramelise.
    5. Lay the rocket onto the plate next to the burrata
    6. Add the caramelised figs on top of the rocket
    7. Now arrange the remaining quartered fresh figs on top
    8. Mix the olive oil and balsamic vinegar together and drizzle over entire plate
    9. Season with salt & pepper and add micro herbs to garnish (optional)
    10. Enjoy!

    Notes

    We buy our fresh burrata from our local Italian deli. Some supermarkets stock it also, just always ensure it is fresh!

    Rocket/arugula leaves are so important in this dish as they add a peppery, earthy taste.

    Use the best quality EVOO and balsamic vinegar that you can find.

    • Category: Appetizer, Dinner, Lunch
    • Method: Frying
  • Pimped Peas on toast

    Pimped Peas on toast

    Print
    clock clock iconcutlery cutlery iconflag flag iconfolder folder iconinstagram instagram iconpinterest pinterest iconfacebook facebook iconprint print iconsquares squares iconheart heart iconheart solid heart solid icon

    Pimped Peas on toast


    • Author: editor|maison1973
    • Total Time: approx 25 min

    Description

    This is a staple here at maison HQ. As a LOVER of peas we’ve tried sooooo many recipes and techniques, but we keep coming back to this one. Fresh, vibrant and the ideal brunch or lunch. The peas work superbly with the tangy chimichurri drizzled over them, and the crunch of the toast. Super easy and tasty.

    Serves 2


    Ingredients

    Scale
    1 cup frozen baby peas (we like baby peas for their sweetness) 1 lemon – for zesting, juice and a segment 1 burrata ball (an Italian cows milk cheese) – drained and gently torn into segments 1 small knob of unsalted butter 2 slices of toast (we love sourdough or rye) lightly buttered (optional) for Chimichurri: 1 small bunch of flat leaf parsley leaves chopped finely (reserve a couple of leaves for garnishing) 2 finely minced (or grated) garlic cloves 1 tbs red wine vinegar 2 tbs extra virgin olive oil 1/2 tsp dried oregano a pinch of salt (or alternatively, we love to use an anchovy fillet) a pinch of white pepper a pinch of chilli flakes (optional)

    Instructions

    1. In a food processor (or mortar and pestle) combine all of the chimichurri ingredients till just blended and set aside for the flavour to enhance whilst you prepare the peas
    2. Place frozen peas into a hot pan with the small knob of butter and toss until just cooked through and liquid evaporates (or alternatively you can steam them in boiling water for 2-3mins and drain). Either way, you want the peas to still be green and vibrant – don’t overcook!
    3. Whilst peas are cooking, lightly toast your bread
    4. Remove half of the peas from pan with a slotted spoon, place into a bowl and gently mash with a fork.
    5. Add remaining peas to mixture and stir through half of the chimichurri mixture and a small amount of lemon zest and a squeeze of lemon juice (optional). Season to taste.
    6. Spoon the pea mixture onto each slice of toast
    7. Top with equal amounts of torn burrata cheese
    8. Drizzle over remaining chimichurri sauce
    9. Garnish with some of the remaining whole parsley leaves and a small wedge of lemon
    10. Enjoy!


    Notes

    We buy our burrata from our local deli. Some supermarkets stock it as well.

    Don’t overcook your peas! They need to hold  little bit of bite for texture and remain vibrant in colour

    Season your chimichurri to taste – we love ours quite zesty and tangy and sometimes with a bit of chilli flakes, sometimes without. Up to you! Be mindful if you use an anchovy fillet – you won’t need to add salt as well

    We love a little bit of white pepper in our chimichurri too, but this is optional

    • Prep Time: 15 min
    • Cook Time: 10 min
    • Category: Lunch, Side Dish, Snack
    • Method: Sautéing, Steaming
  • Rhubarb & Apple Crumble Cake

    Rhubarb & Apple Crumble Cake

    Print
    clock clock iconcutlery cutlery iconflag flag iconfolder folder iconinstagram instagram iconpinterest pinterest iconfacebook facebook iconprint print iconsquares squares iconheart heart iconheart solid heart solid icon

    Rhubarb & Apple Crumble Cake


    • Author: editor|maison1973
    • Total Time: approx. 90 min

    Description

    This delicious cake is best served warm and when rhubarb is in season. It has such a distinctive sweet and tangy flavour and is an elevated version of a simple apple crumble. To note: Please ensure that you discard all of the rhubarb leaves – they are toxic and inedible. They contain high concentrations of oxalic acid and anthraquinone glycosides.

    Serves 6


    Ingredients

    Units Scale
    for cake: 1 bunch rhubarb stalks (leaves must be fully discarded – see above) – before using the rhubarb please be sure to cut off any brown bits at the end of each stalk, wash, dry & trim thoroughly and then cut into approx. 3cm pieces. 2 green apples, peeled, cored and sliced 110g caster sugar 90g unsalted butter at room temperature 2 eggs, lightly whisked 75g self raising flour Pinch of salt 1 tbs extra self raising flour 2tbs milk for crumble: 50g plain flour 60g butter, cold and cubed 2tbs light brown sugar icing sugar to serve Creme fraiche or vanilla ice cream to serve (optional)

    Instructions

    1. Preheat over to 190 degrees celsius (374 Fahrenheit)
    2. Grease a 20cm springform cake tin
    3. Prepare crumble topping by sifting flour into a bowl and rubbing in the butter until it resembles coarse sand in texture. Stir in light brown sugar and set aside. (If you prefer, you can also prepare this in a food processor)
    4. Combine the rhubarb and apple with 1tbs of the caster sugar and mix well. Set aside.
    5. In a mixer (or with a hand mixer), beat the butter until creamy in texture. Add the remaining sugar and beat until light and fluffy
    6. Add the eggs in two stages; beating well after each addition. Add the extra tablespoon of flour now to prevent the butter and eggs from separating
    7. Sift the flour and salt into the butter mixture and fold together. If the mixture is too dry, add a couple of tablespoons (maximum) of milk to loosen it up a little
    8. Spread the mixture into the cake tin. Cover with the rhubarb and apple mixture and then the crumble topping
    9. Bake for 1 hour and 15 minutes until the top is golden and a skewer or toothpick, comes out clean
    10. Let cool on a wire rack and dust with icing sugar
    11. Slice into generous servings and add ice cream, creme fraiche or thickened cream to serve


    Notes

    Please ensure that you discard all of the rhubarb leaves – they are toxic and inedible. They contain high concentrations of oxalic acid and anthraquinone glycosides.

    • Prep Time: 15 minutes
    • Cook Time: 1 hour and 15 minutes
    • Category: Dessert
    • Method: Baking
  • The Anytime Risotto

    The Anytime Risotto

    Print
    clock clock iconcutlery cutlery iconflag flag iconfolder folder iconinstagram instagram iconpinterest pinterest iconfacebook facebook iconprint print iconsquares squares iconheart heart iconheart solid heart solid icon

    The Anytime Risotto


    • Author: editor|maison1973
    • Total Time: approx 45 min

    Description

    A good risotto has a way of making any day feel just that little bit more special. This one is simple and easy to love, with leeks, mushrooms and peas. You can modify it to your taste, as this is a versatile base that starts with just a handful of simple, quality ingredients.

    This recipe serves 2 (generously) as a main, or 4 as a side.


    Ingredients

    Units Scale
    1 leek rinsed and finely chopped 150g white or brown mushrooms, sliced 1 large garlic clove, peeled and finely chopped 3/4 cup aborio rice 1/4 cup dry white wine 1 litre chicken or vegetable stock (we use low salt or unsalted as we prefer to control the seasoning) 1 bunch of asparagus, trimmed and cut into small pieces 1/2 cup frozen peas (we prefer baby peas as they add a lovely sweetness) 2 tbsp olive oil 1/2 lemon, juiced 1 tbsp butter (we prefer unsalted for this recipe) 1/4 cup parmigiano regiano (parmesan) cheese (or we also use Grana Padano) Freshly ground sea salt and pepper to taste finely chopped parsley for garnishing (optional)

    Instructions

    1. Heat the stock in a saucepan over medium heat to bring to a gentle boil. Then turn the heat down to a simmer
    2. Add 1 tbsp of olive oil to a large saucepan, add the mushrooms and fry over medium to high heat until golden (approx. 5-7min).  Remove with a slotted spoon and allow to rest.
    3. In the same saucepan, add 1 tbsp of olive oil into a saucepan over medium heat. Add leek and garlic and gently saute till translucent (approx 3 min, being careful not to burn them)
    4. Once leek and garlic is translucent, add rice and continually stir for 1-2 min to coat each grain. This process is called ‘tostatura‘ (toasting) and is an important step in providing the nutty flavour and creamy texture to the finished risotto.
    5. Add the dry white wine to the hot pan to deglaze the rice. Stir through until it is fully evaporated and the aroma of the wine disappears. This process is called ‘sfumatura
    6. Add one ladle at a time of the broth to the pan and stir until fully absorbed. Continue this process one ladle at a time until all of the broth is absorbed and the rice moves in a nice ‘wave’ through the pan when you run your spoon through it. The texture of the rice should be slightly chewy but creamy. This process takes approx. 20 minutes
    7. Add the aspragus and peas and stir through till just cooked. Don’t overcook the vegetables. You want them to remain their vibrancy of colour and texture. Approx 3-5 min
    8. Add the mushrooms back to the pan and gently stir through to combine.
    9. Remove pan from heat and immediately stir through the butter and cheese to get a creamy consistency
    10. Season with salt and pepper to taste and the squeeze of lemon juice
    11. Let the risotto rest for a couple of minutes so all of the flavours blend together.
    12. Serve with a light drizzle of olive oil and finely chopped parsley to finish

    Notes

    1. Always ensure your broth is warm before it is added to the pan
    2. It’s important to stir your rice with each ladle, but no need to over stir continuously as this can make the risotto feel ‘gluggy’ as it releases too much starch
    3. If your risotto feels too dry, add a little more (heated) stock to the pan and stir gently to loosen
    4. If the risotto is sticking to the bottom of the pan, turn the heat down slightly and continue stirring to loosen
    5. This base recipe is incredibly versatile – ie. you can add roasted pumpkin instead of mushrooms, substitute the leek for onion, add diced bacon or pancetta etc. Once you know the basics of a good risotto, you can modify it to suit!
    6. If you don’t wish to use wine, you can substitute with a little bit of lemon juice at this stage of the cooking process (to provide the acidity required), or alternatively you could use a non-alcoholic white wine.
    • Prep Time: 15 min
    • Cook Time: 30 min
    • Category: Dinner, Lunch, Side Dish
    • Method: Sautéing
    • Cuisine: Italian
  • Cauliflower et miso

    Cauliflower et miso

    Print
    clock clock iconcutlery cutlery iconflag flag iconfolder folder iconinstagram instagram iconpinterest pinterest iconfacebook facebook iconprint print iconsquares squares iconheart heart iconheart solid heart solid icon

    Cauliflower et miso


    • Author: editor|maison1973
    • Total Time: 1 hour 10 minutes

    Description

    A delicious and simple baked cauliflower that is elevated to another level! Perfect as a side dish to steak, chicken or fish, or as a standalone main course served with rice or salad.

    This recipe serves 4.


    Ingredients

    Units Scale
    1 large cauliflower – outer leaves removed (we love to leave just a couple) and base trimmed 1 tbsp extra virgin olive oil 1 tbsp of miso paste of choice 1 tbsp light soy sauce 2 tbsp honey 500ml chicken or vegetable stock (we use low salt or unsalted as we prefer to control the seasoning) juice and zest of 1 lemon Grated knob of fresh ginger (optional) sprinkling of sea salt and black pepper (to taste)

    Instructions


    1. Preheat oven 180°C (degree Celsius) or 356°F (degree Fahrenheit
    2. Trim and rinse cauliflower and leave whole
    3. Place cauliflower in a deep baking / casserole dish (with lid)
    4. Combine all remaining ingredients into a jug and mix well.
    5. Pour over the cauliflower, making sure to coat well.
    6. Cover with foil and lid and place into oven. Bake with lid on for approx. 40 min
    7. Check if cauliflower tender with a knife in centre. If tender, remove lid and foil and baste with juices from pot.
    8. Increase heat to 200°C (degree Celsius) or is 392°F (degree Fahrenheit) and place back into oven and bake until golden and slightly caramelised – another approx 20min. 
    9. Remove from oven and transfer to plate for serving. Spoon over remaining sauce.

    Notes

    1. We love to add a drizzle of extra virgin oil before serving and a good grind of black pepper
    2. Go lightly on the sea salt as the soy sauce provides enough saltiness!
    • Prep Time: 10 minutes
    • Cook Time: 1 hour
    • Category: Dinner, Lunch, Side Dish
    • Method: Baking
    • Cuisine: Japanese
  • The Brunch Beans

    The Brunch Beans

    Print
    clock clock iconcutlery cutlery iconflag flag iconfolder folder iconinstagram instagram iconpinterest pinterest iconfacebook facebook iconprint print iconsquares squares iconheart heart iconheart solid heart solid icon
    Brunch Beans

    The Brunch Beans


    • Author: editor|maison1973
    • Total Time: approx 30 min

    Description

    A deliciously creamy (minus the cream!) and hearty bowl of cannellini beans that you will want to serve with crusty sourdough and perhaps some spicy sardines…this is a favourite of ours to serve as a late breakfast / brunch or lunch dish. It’s so quick, easy and incredibly tasty!

    Serves 2


    Ingredients

    Units Scale
    For beans: 1 can (approx. 420g or 15-16 ounce) of cannellini beans (see notes), drained and rinsed 1 garlic clove, finely chopped, minced or grated 1 lemon – zest and juice 1 tbsp extra virgin olive oil 500ml of chicken or vegetable broth or stock (we use low salt or unsalted as we prefer to control the seasoning) 50g of grated parmesan cheese For gremolata: 1/2 bunch of flat leaf parsley 1/2 clove garlic lemon zest of one lemon and a small squeeze of juice 12 anchovy fillets (optional) 1 tsp extra virgin olive oil Salt & freshly ground black pepper to taste

    Instructions

    1. To make the gremolata, mix all of the ingredients in a small blender, or we prefer to use a mortar and pestle. Whichever method used, try not to over blend – you want to keep some texture. Once made, check seasoning and adjust to taste (should taste zesty and fresh – and not too salty). Set aside
    2. To make the beans: place a little of the extra virgin olive oil into a medium size fry pan over medium heat
    3. Add the garlic and saute till translucent – a couple of minutes (be careful not to burn or colour!)
    4. Add the beans and stir through – a couple of minutes
    5. Add half of the stock and simmer the beans until softer (approx. 5 min)
    6. Take a masher (or the back of a large wooden spoon) and gently pressed down on the beans so that some are slightly mashed (this process helps give the beans their ‘creamy’ texture)
    7. Add the lemon juice and remainder of stock
    8. Simmer for another 5 minutes or until the beans have a softer, creamy consistency.
    9. Remove from heat and add in the parmesan cheese and stir to combine (and until cheese is melted)
    10. Season with freshly ground black pepper and salt
    11. Serve in a bowl, topped with gremolata and sourdough bread, lightly toasted for dipping!

    Notes

    1. We prefer to use canned organic cannellini beans whenever we can
    2. We love to serve these beans with a side of spicy or smoked sardines!
    3. If you love a bit of extra spice, a splash of green or red tabasco sauce is also fantastic with this dish.
    • Prep Time: 15 min
    • Cook Time: 15 min
    • Category: Breakfast, Dinner, Lunch, Side Dish, Snack
    • Method: Frying, Sautéing
    • Cuisine: Mediterranean